Typesetting Markdown – Part 8: Annotations
Dave Jarvis, April 28 2020 
This part in the series explores pandoc’s annotation Markdown extension, as well as creating themes using ConTeXt.
Preamble
What’s in store (take them all):
- Dr. Jekyll and Mr. Hyde – sample output we’ll create
- book.zip – shell scripts, lua code, extensible stylesheets
- themes.zip – book themes to create beautiful PDF files
Tools you’ll need:
What to do:
- Rename
$HOME/dev/writing/bookto something else, if it exists. - Unzip
book.zipinside$HOME/dev/writing. - Move
$HOME/dev/writing/book/build-templateinto$HOME/bin. - Unzip
themes.zipinside$HOME/dev/writing/book. - Run
$HOME/dev/writing/book/buildto generate books. - Open
novel.pdfand enjoy!
Confirm the book directory hierarchy under $HOME/dev/writing matches:
book
├── standard-ebooks
│   ├── jekyll-hyde
│   ├── les-miserables
│   ├── pride-prejudice
│   └── wuthering-heights
Be sure to review any shell scripts you download before running them.
Example run:
cd $HOME/dev/writing/book
./build -V -c -y -i jekyll-hyde -d standard-ebooks/jekyll-hyde \
-b robert-louis-stevenson_the-strange-case-of-dr-jekyll-and-mr-hyde
Read on to learn more about typesetting poems using annotations, or skip to Novel Content for an in-depth review about how to typeset Standard Ebook novels using annotations.
Introduction
Part 7 described typesetting math and using variables to change parameters to equations. This part visits the interplay between an extended Markdown syntax, parsing text using Lua, and defining ConTeXt macros that can be formatted thematically. We’ll review professionally produced book interiors then craft our own themes to various documents inspired from existing layouts.
Separating what you want to communicate–the content or data model—from how you want it shown—the presentation—is a powerful abstraction.
The Treachery of Images
René Magritte’s iconic painting, Ceci n’est pas une pipe, embodies what humans have known since the dawn of civilization: words and pictures are not themselves the items to which they refer. Rather, they are symbolic representations of the item. We can think of the word pipe as a general model to describe a broad category of possible forms.
Doing with Images makes Symbols
Dr. Alan Kay’s Doing with Images makes Symbols depicts numerous systems that hide complex models behind simple, clever graphical user interfaces. In the first graphical user interface Dr. Kay reviews, the mathematical model defines the content and the transformations applied to each instance define how they are displayed.
CSS Zen Garden
Side-stepping the functional CSS versus semantic CSS debate, Dave Shea’s CSS Zen Garden opened developers’ eyes to scores of possible themes crafted by changing only the presentation layer: the CSS. No changes to the model—the HTML source—are necessary.
Impacts Project
For my Impacts Project, different photobook publishers had different technical requirements. Some publishers required using backround images that spanned two pages while others needed separate pages altogether. By writing the content in pandoc-flavoured Markdown then applying different themes using ConTeXt, multiple layout variations were produced without having to maintain two copies of the prose. Separation was possible by annotating parts of the text, semantically.
Annotations
Annotations are labels that authors can specify to classify blocks of text.
Supercentenarians may recall how Frost’s Fire and Ice was presented, which will suffice as output we want to achieve:
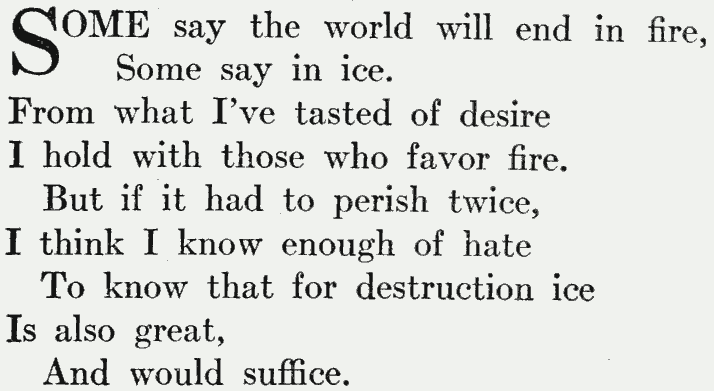
To demonstrate separating content from presentation, our goal is to take an unformatted, annotated Markdown document and generate a document that resembles the original formatting from 1920.
Here’s the Markdown for Fire and Ice, classified with a poem annotation:
::: poem
Some say the world will end in fire,
Some say in ice.
From what I’ve tasted of desire
I hold with those who favor fire.
But if it had to perish twice,
I think I know enough of hate
To say that for destruction ice
Is also great,
And would suffice.
:::
Notice how the first and last lines have three full colons (:::). The colons instruct pandoc to mark everything in between as a document fragment annotated with a poem class. Save the above as poem.md, then run pandoc on the file, preserving the line breaks:
pandoc -t html -f markdown --wrap=preserve poem.mdThe output begins with an HTML element that includes the poem class:
<div class="poem">For ConTeXt, we’d expect the output to resemble:
\startpoemor the LaTeX output to be:
\begin{poem}But, at time of writing, pandoc does not honour the classes for TeX output because it would result in code that cannot be interpreted by a TeX engine. (There’s no technical reason that prevents pandoc from offering a well-documented option that permits generating “broken” TeX documents. By the time an author understands TeX macros, they probably know how to fix them. I digress.)
Rather, ConTeXt and LaTeX start with the poem’s first line.
LaTeX users can install the pandoc-latex-environment filter and its dependencies to side-step the issue; however, ConTeXt users must write a script to resolve the problem. Suddenly, a rabbit hole named Lua appears.
Lua
Lua is a scripting language that pandoc can use when processing documents. To see how it works, first create a new book directory:
cd $HOME/writing
mv book book.old.01
mkdir book
cd book
Move or copy poem.md into the book directory. Create a new file named classify.lua, in the same directory, having the following contents:
function Div( element )
  local annotation = element.classes:find_if( matches )

  if annotation then
    annotation = annotation:gsub( "[^%w]*", "" )

    return {
      context( "\\start", annotation ),
      element,
      context( "\\stop", annotation )
    }
  end
end

function matches( s )
  return s:match( "^%a+" )
end

function context( macro, annotation )
  return pandoc.RawBlock( "context", macro .. annotation )
end
In structured document parsing lingo, an element is a named container that may hold content, including other containers. Breaking down the above Lua code, the first line declares a function that is called whenever pandoc encounters a div element in the source document:
function Div( element )Pandoc interprets triple colons (:::) as div elements. Every div may have associated classes, also called annotations. Continuing, the following line finds all classes for each div that match a particular pattern:
local annotation = element.classes:find_if( matches )The pattern is defined by the return line of the matches function, which checks whether the annotation begins (^) with at least one (+) upper- or lowercase alphabetic ASCII character (%a; apologies to anyone reading who would like to use UTF-8 characters in their annotation names):
return s:match( "^%a+" )If an annotation is found that matches the given criteria, then the set ([, ]) of all (*) alphanumeric characters (%w) that do not match (^) the annotation’s name are replaced with the empty string (""):
annotation = annotation:gsub( "[^%w]*", "" )The script then wraps the \start and \stop ConTeXt macros around the matching element’s entire content using the annotation’s name:
context( "\\start", annotation ),
element,
context( "\\stop", annotation )
Calling our context function requests that pandoc generate a raw text block using the macro prefix and annotation name. Providing both the macro prefix and the extracted annotation name tells pandoc to write \startpoem (or \stoppoem) to the generated document:
return pandoc.RawBlock( "context", macro .. annotation )Invoke pandoc to verify that the filter produces the expected macros:
pandoc --lua-filter classify.lua -t context \
  -f markdown --wrap=preserve -o poem.tex poem.md
cat poem.tex
At last, we’ve reached the rabbit hole’s den:
\startpoem
  % ... Removed for brevity.
\stoppoem
We can now export custom Markdown annotations as ConTeXt macros.
Style
The poem has a few problems to solve:
- Uppercasing
- Line counting
- Presenting
Uppercasing
Using an ornate first character at the start of text is sometimes called a drop cap or lettrine. ConTeXt has a lettrine module, but using it means marking up the poem text with the \lettrine macro: mixing presentation logic with the plain source document.
ConTeXt, also at time of writing, did not have a font feature available to change words to uppercase. Graciously, folks from the mailing list offered a solution.
Create a new file named uppercase.tex in the book directory having the following contents:
\startluacode
  fonts.handlers.otf.addfeature {
    name    = "uppercasing",
    type    = "substitution",
    prepend = true,
    data    = characters.uccodes
  }
\stopluacode

\definefontfeature[uppercasing][uppercasing=yes]

\unexpanded\def\uppercasing{\feature[+]{uppercasing}}
The code adds a new font feature called uppercasing to OpenType Fonts (OTF). At some point in the future the above code (along with lowercasing) may be added to the ConTeXt distribution.
Line Counting
Frost’s poem has lines with a variety of indentation levels. ConTeXt does not appear to count individual lines within setuplines environments. This means we’ll need to create a counter to track what line of the poem is about to be printed. From there we can adjust the depth of indentation. Start by defining a counter:
\definecounter[PoemLineCount][way=bytext]Using way=bytext prevents the counter from resetting to zero on new pages. The Poem prefix combined with TitleCase helps avoid inadvertant name collisions.
Counters can be set (e.g., initialized to zero), incremented, and retrieved as follows, respectively:
\setnumber[PoemLineCount][0]
\incrementcounter[PoemLineCount]
\rawcountervalue[PoemLineCount]
Presenting
With counters in mind, create a new file named style.tex in the same book directory containing the following text:
\setupinitial[n=2, distance=-2pt]

\definealternativestyle[poem:Uppercase][{\tfa\bf\uppercasing}][]

\definefirstline[poem:FirstLine][%
  alternative=word,
  style=poem:Uppercase,
  n=1,
]

\definestartstop[poem][
  before={\startlines \setfirstline[poem:FirstLine] \placeinitial},
  after={\stoplines},
]

\definecounter[PoemLineCount][way=bytext]

\definedataset[PoemIndent]
\setdataset[PoemIndent][2][option={yes, 4.00em}]
\setdataset[PoemIndent][3][option={no,  0.00em}]
\setdataset[PoemIndent][5][option={yes, 0.75em}]
\def\PoemIndentOpt{%
  \datasetvariable
    {PoemIndent}{\rawcountervalue[PoemLineCount]}{option}%
}

\setuplines[
  indenting=odd,
  before={\setnumber[PoemLineCount][0]},
  command={%
    \incrementcounter[PoemLineCount]
    \setupindenting[\PoemIndentOpt]
  },
]
From the top, the first line configures how drop caps will be applied to the first letter of each text block that’s annotated with poem:
\setupinitial[n=2, distance=-2pt]Passing n=2 sets the number of lines the initial letter will span, effectively controlling its height. The distance option allows pixel-perfect adjustment of the spacing between the lettrine and the second letter that follows.
Next up is registering an alternative style that we’ll use to configure how the first word of the first line will appear:
\definealternativestyle[poem:Uppercase][{\tfa\bf\uppercasing}][]The alternative style is named poem:Uppercase and how the style temporarily affects how the font is defined by the following macros:
\tfa– sets the font size a little larger;\bf– sets the font style to a bold face; and\uppercasing– switches to the uppercase feature set.
Finally, the cog of the lettrine’s wheel:
\definefirstline[poem:FirstLine][%
  alternative=word,
  style=poem:Uppercase,
  n=1,
]
As its name implies, the definefirstline environment allows changing how the first line of text appears. The alternative option can be either line to affect the entire line or word to affect only a given number of words. The style references the predefined alternative style for switching the font. Passing n=1 restricts the number of words affected to the first.
The pandoc filter—the Lua script—converted the leading ::: poem to \startpoem and the trailing ::: to \stoppoem. In ConTeXt, this start/stop pairing is an environment that can contain other commands. Recall that pandoc does not allow people to generate “broken” documents; pandoc has no assurance that the start/stop environment for a poem exists; our Lua script has created a “broken” document. So the poem environment must be defined somewhere, which is accomplished by the following definition:
\definestartstop[poem][
  before={\startlines \setfirstline[poem:FirstLine] \placeinitial},
  after={\stoplines},
]
Providing poem as the name creates both \startpoem and \stoppoem as macros that ConTeXt will now recognize. The before option defines the commands to run when \startpoem is encountered:
\startlines– indicates to enter a “lines” environment;\setfirstline– restyles the first word of the first line; and\placeinitial– makes the first letter of the first word a drop cap.
The counter line before the data set should look familiar:
\definecounter[PoemLineCount][way=bytext]

\definedataset[PoemIndent]
\setdataset[PoemIndent][2][option={yes, 4.00em}]
\setdataset[PoemIndent][3][option={no,  0.00em}]
\setdataset[PoemIndent][5][option={yes, 0.75em}]
To avoid duplicating conditional statements, we define a data set that associates keys with values. In this case, the keys are the line numbers—2, 3, and 5—and the values are the special indentation rules. We’ll cross-reference the keys using the PoemLineCount counter. As PoemLineCount changes value, ConTeXt will retrieve the rules for typesetting the indentation.
Next up, a macro is defined that looks up the indenting rules based on the current line count:
\def\PoemIndentOpt{%
  \datasetvariable
    {PoemIndent}{\rawcountervalue[PoemLineCount]}{option}%
}
The reason for using \def—not \define—is explained elsewhere.
Mimicking the original indentation from the 1920s magazine takes some doing, but with the foundation in place, the code can be expressed tersely:
\setuplines[
  indenting=odd,
  before={\setnumber[PoemLineCount][0]},
  command={%
    \incrementcounter[PoemLineCount]
    \setupindenting[\PoemIndentOpt]
  },
]
We use \setuplines to configure the \startlines and \stoplines from the poem’s environment definition. By default, we want most of the odd lines to be indented by a small amount (0.75em). Before every poem is exported to the document, the counter for each line in the poem is set to 0—this allows the same formatting to be reused for all such annotated poems; without resetting the counter, subsequent poems would not be indented as desired because the cross-referenced key (PoemLineCount) would continuously increment upwards.
Lastly, the command option sets up the macros to run for each line in the poem. Even though odd lines are indented by default (indenting=odd), the original poem’s indentation varies uniquely. These variations are captured by changing the indentation setup when certain line numbers are encountered. The 2nd line is indented fairly far, the 3rd line is not indented at all, the 4th line isn’t indented because it is even, and the remaining odd lines (5, 7, and 9) are all indented the same amount.
Importing
At this point we have the following files:
classify.lua– converts annotations to ConTeXt environments;uppercase.tex– provides an uppercase font feature; andstyle.tex– defines how text annotated withpoemappears.
Create one more file named main.tex in the book directory. Paste the following commands into it:
\input uppercase
\input style

\starttext
  \input poem
\stoptext
When we get to theming, we’ll see how including files this way does not allow changing the document appearance easily.
Until then, run ConTeXt to generate main.pdf:
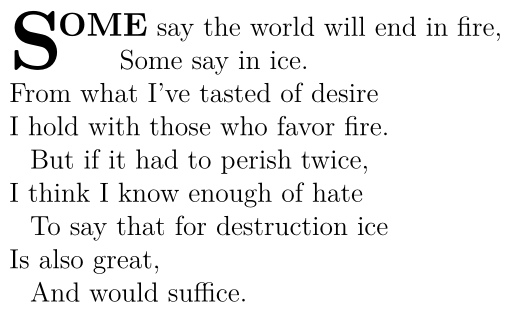
context main.texOriginal font face and minor microtypography issues notwithstanding, we have faithfully reproduced the poem as it was first published:
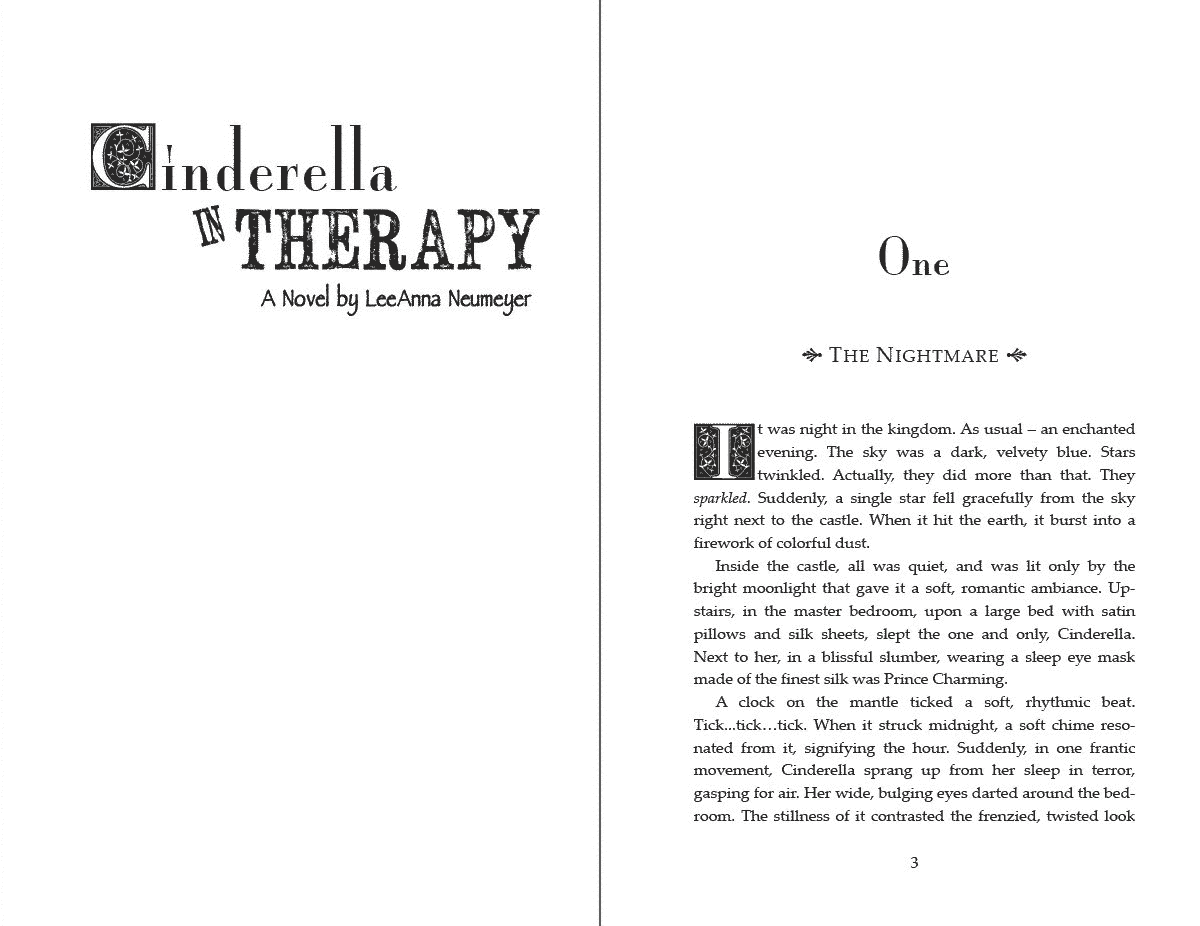
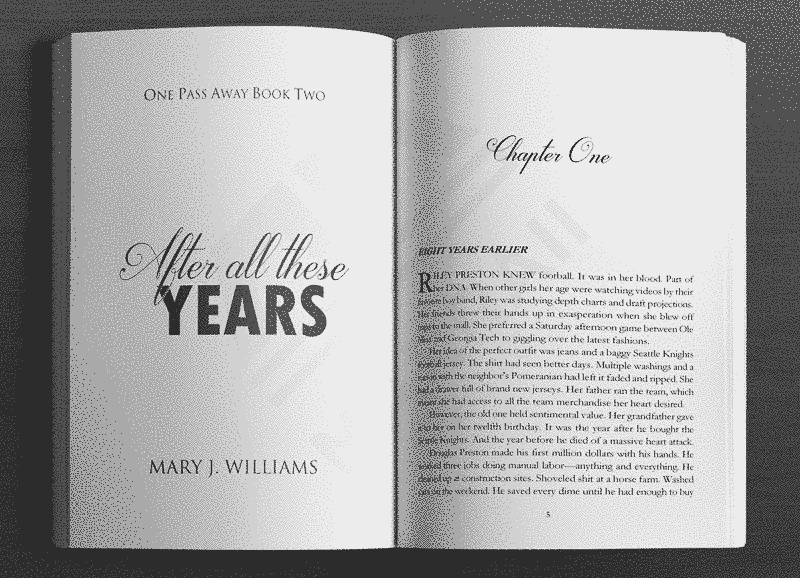
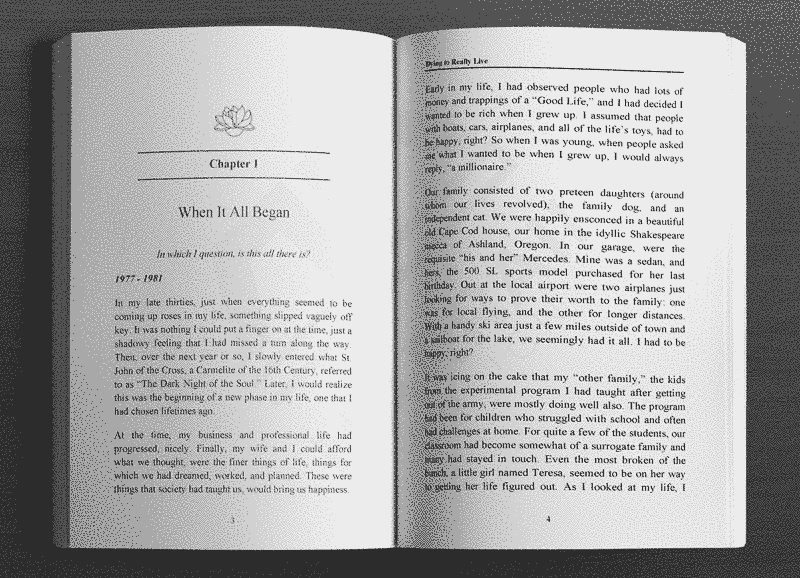
In the next sections we’ll take a brief look at interior page design, review professionally crafted page layouts, and then find a Markdown book to style a few different ways.
Interior Book Design
Interior book design is a deep topic by itself (see my notes for a brief summary). A classic page layout—such as Tschichold’s page format that’s based on the golden ratio—resembles:

Fortunately, ConTeXt provides an excellent default page layout:

ConTeXt applies the same general principles that publications from professional book designers follow. We’ll draw inspiration from samples crafted by a random selection of designers:
Examples from Sean Ford:
Examples from Maureen Cutajar:

Examples from Marraii Designs:
Examples from David Moratto:
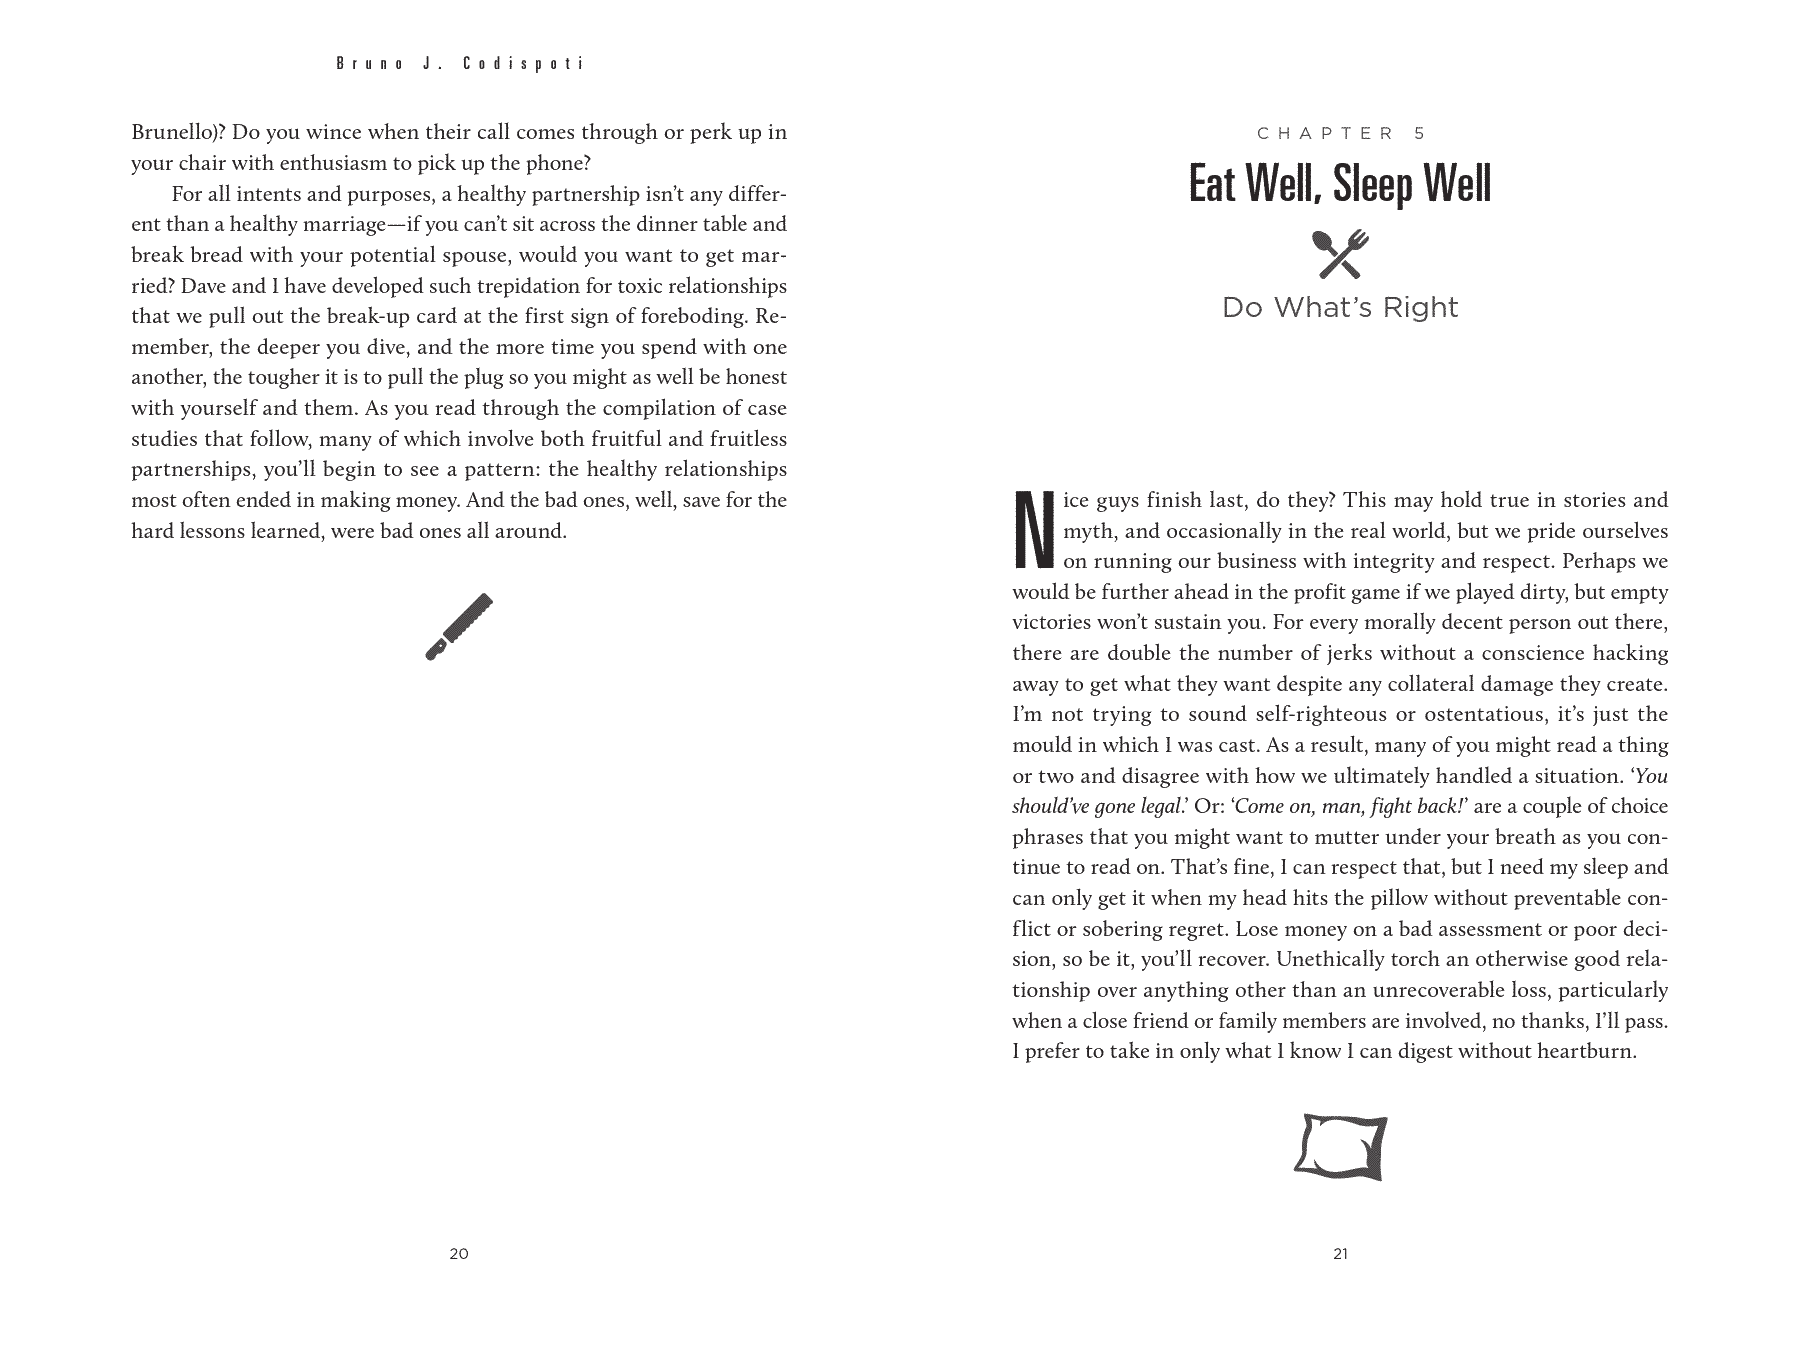
Novel Content
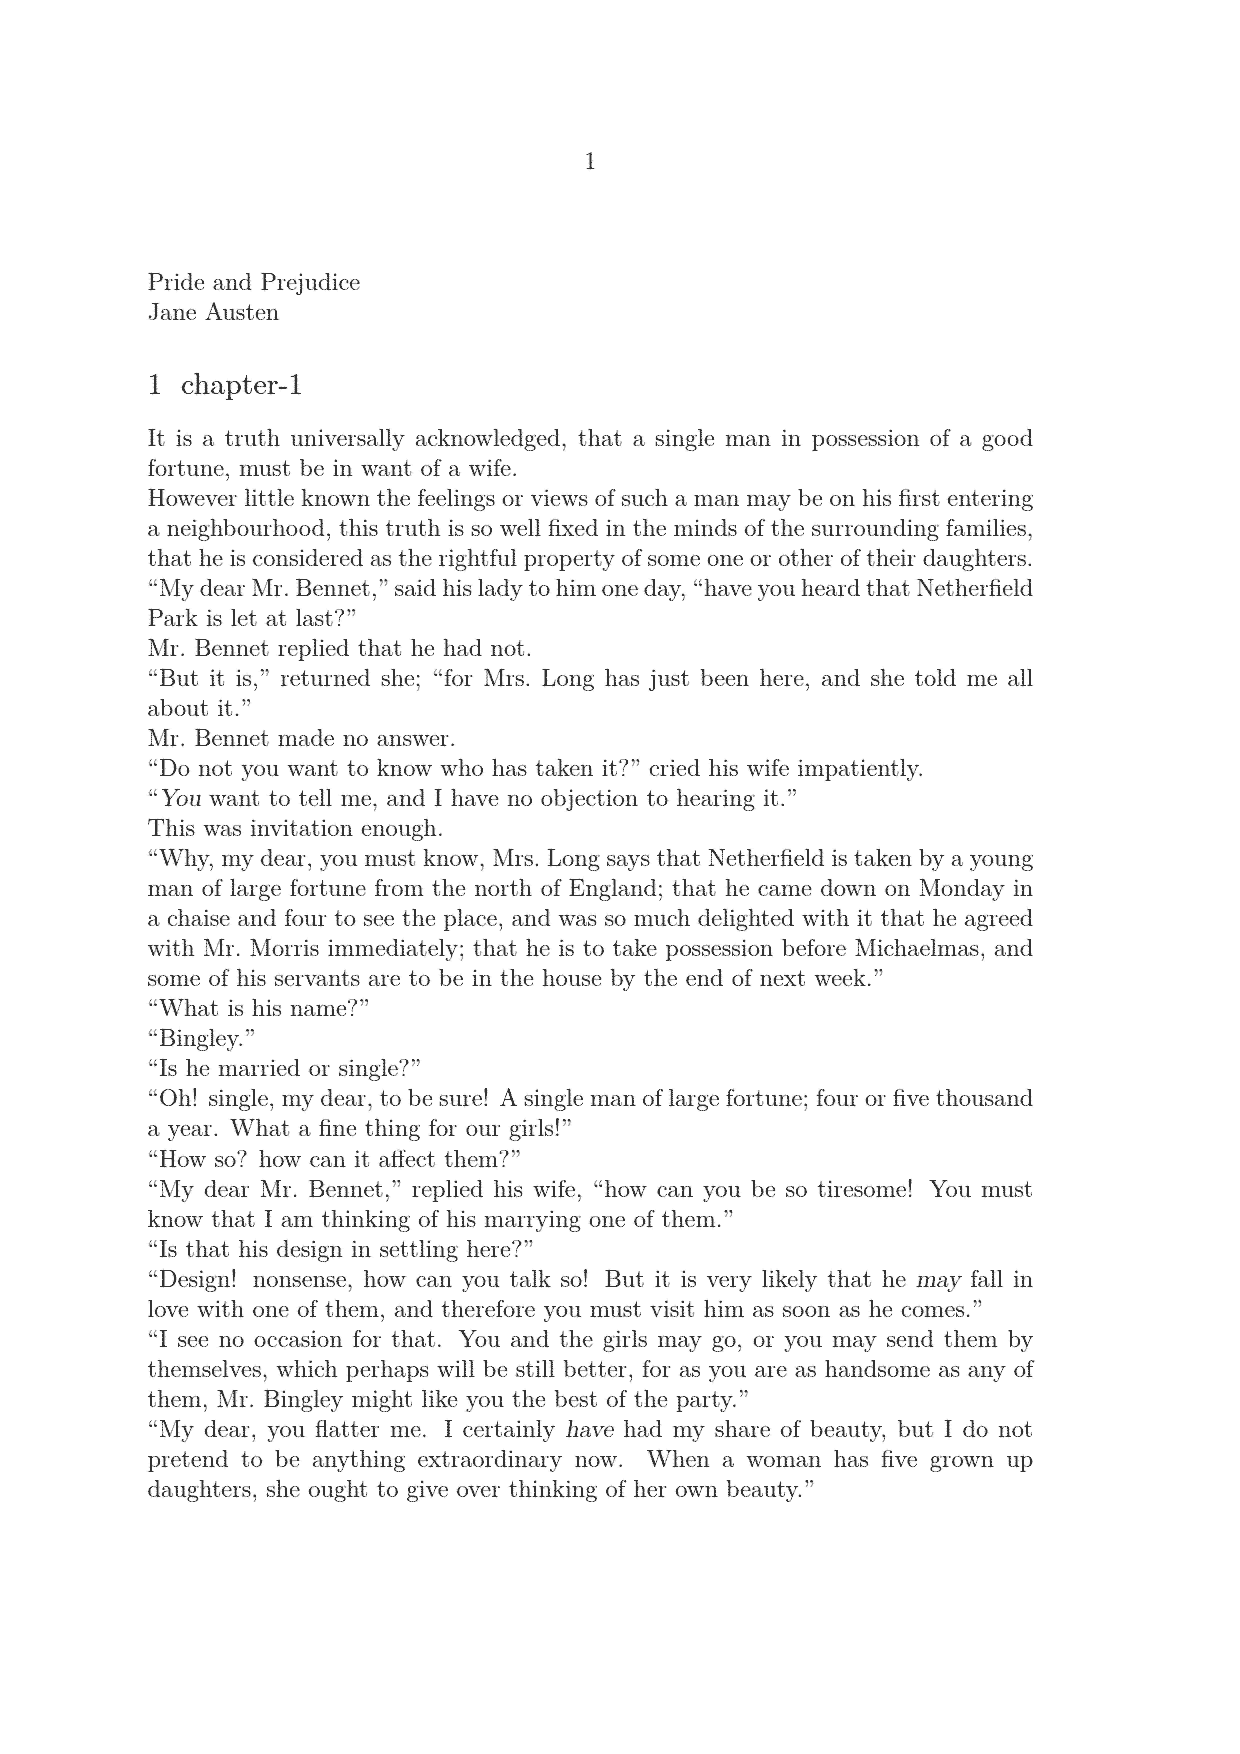
To make stylish themes for novels, it would be convenient to have novels to stylize. Although Project Gutenberg has an extensive library of free books, they are quite unsuitable for typesetting automatically. Rather, Standard Ebooks offer novels far more suitable typesetting in different themes.
The people at Standard Ebooks have carefully and painstakingly format-shifted plain text novels offered by Project Gutenberg into epub files. Using epub is a splendid choice because it allows editors to impart semantic meaning on the prose in a machine-readable format.
Converting ebub files to Markdown involved some yak shaving, described in Project Gutenberg Projects. We’ll borrow heavily from that effort.
Requirements
Install the software in the following sections to follow along.
System Applications
Download and install the following tools, if you haven’t already:
Set an environment variable named SAXON_JAR to the fully qualified path (directory plus file name) for saxon-he-10.0.jar. Substitute the version of the software that was downloaded, if different.
Ensure that both the XSLT processor and Git are available:
java -jar $SAXON_JAR
git --version
Git, Java, and Saxon-HE are installed.
Scripts and Stylesheets
Download the following file:
- book.zip, distributed under the MIT license.
The archive contains the following files in a book directory:
build- Downloads an epub then transforms it into a PDF filebuild-template- Updated build script templateclassify.lua- Filter that converts annotations into ConTeXt codemain.tex- Minimal starting point for themingse2md.xsl- Stylesheet to transform epub files into Markdownuppercase.tex- Adds uppercasing as a ConTeXt font feature
Install the archive file as follows, making sure to substitute the appropriate path to where book.zip was downloaded:
cd $HOME/dev/writing
mv book book.old.02
unzip $HOME/book.zip
cd book
mkdir -p $HOME/bin
mv build-template $HOME/bin
chmod +x build
If you put build-template in a different directory, change the source line in the build script accordingly.
Typeset Novel
With files in place, typeset a novel as follows:
cd $HOME/dev/writing/book
./build -V
You should see:
[20:34:51.4627] Verify requirements
[20:34:51.4668] Change directory
[20:34:51.4686] Markdown: contents.md
[20:34:51.4701] Compile : ./main.tex
[20:34:51.4713] Contents: ./contents.tex
[20:34:51.4726] Output  : novel.pdf
[20:34:51.4738] Transform jane-austen_pride-and-prejudice into contents.md
[20:34:52.5015] Convert contents.md to ./contents.tex
[20:34:54.2729] Convert ./main.tex to novel.pdf
[20:35:05.8983] Postprocess
Open novel.pdf to reveal:
Pretty decent default settings.
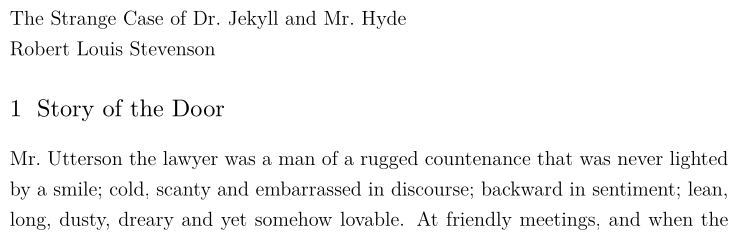
If you don’t already have your own novel in Markdown to typeset, peruse the Standard Ebooks collection. For faster builds, use a shorter book such as Robert Louis Stevenson’s The Strange Case of Dr. Jekyll and Mr. Hyde:
./build -V -b \
  robert-louis-stevenson_the-strange-case-of-dr-jekyll-and-mr-hyde
Note:
- Transcoding may overwrite previous book contents.
- The stylesheet requires epubs that have chapters; if a PDF file is empty, it likely means that the epub uses a different file structure.
- Back up important files in the
bookdirectory before running thebuildscript because the script has options to delete files. - Run
./build -hto see the available command line options.
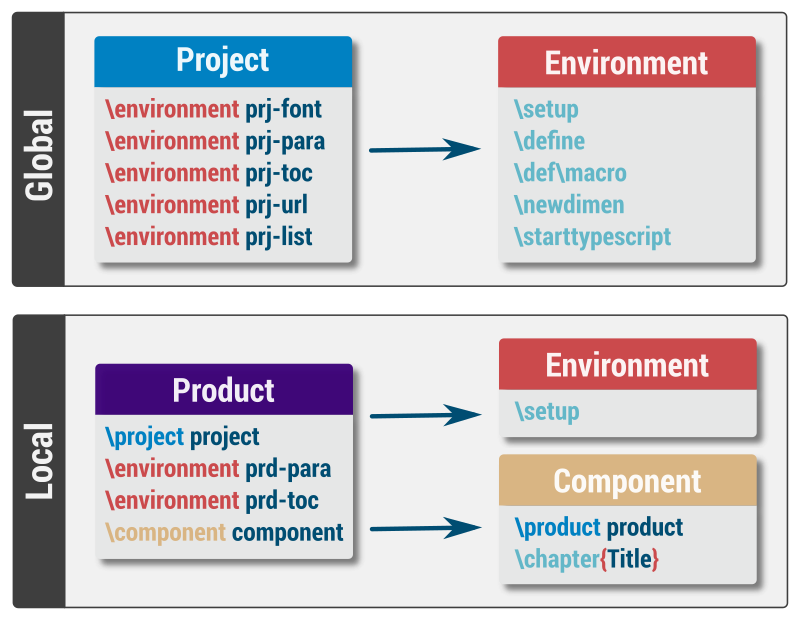
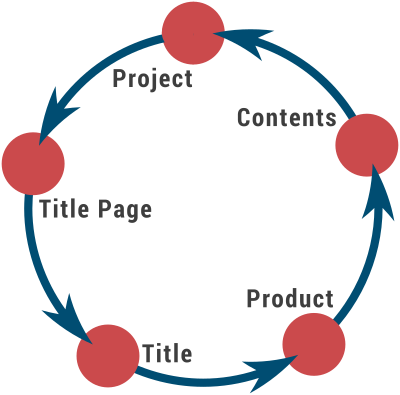
Project Structure
Before defining styles for annotations or thematic styles, it helps to have a structure to organize them. Moreover, being able to define a global style for all documents that can be tweaked for specific documents is our objective. For example, we could style postal letters in a cursive font for older novels while modern books could be styled like electronic messages. Knowing that most public domain novels are rather old, all books would use the cursive font by default, and newer books would have to override that setting.
To accomplish this, keep the following definitions in mind:
- Environment
- Setups that control an aspect of a presentation’s style.
- Component
- Content to be rendered, such as a chapter.
- Product
- A combination of environments and components.
- Project
- A collection of environments applied to many products.
Another way to think of the relationships is depicted in the following figure:
To make this concrete, consider the following example where all Standard Ebooks use the same table of contents (ToC) formatting, except for Jekyll and Hyde, which will format the ToC differently:
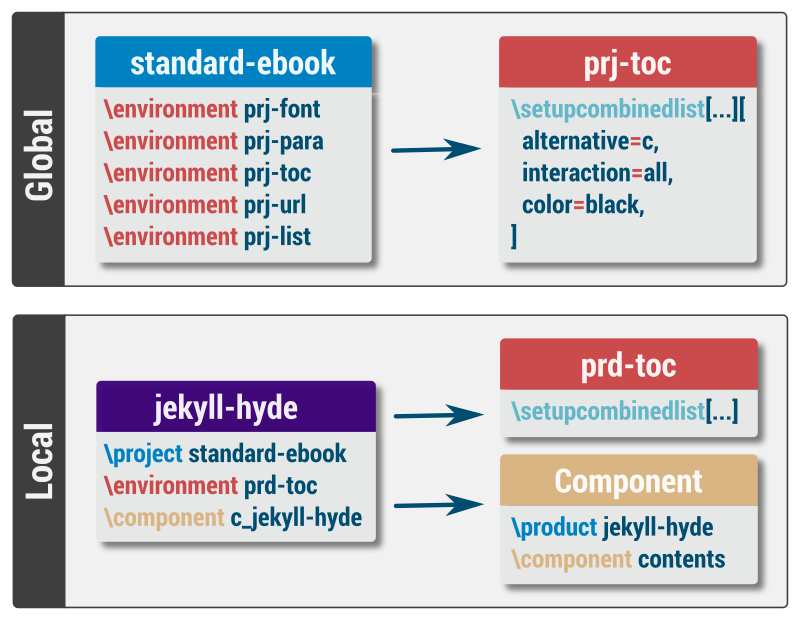
Often a component represents a single chapter, title page, index, or other book matter. Doing so allows for fine-grained control over the product output. By keeping them together, we can simplify the actual local project structure by including the component in the product directly, as shown:

Let’s see how this works.
Setup Generic Project Structure
Create new locations for project and product files:
mkdir -p $HOME/dev/writing/book/project/productInside the project directory create project.tex:
\startproject *
  \environment prj-para
\stopproject
The * instructs ConTeXt to use the file name—without the .tex extension—as the project name. This is a convenient short-cut, but take care to update references when renaming files.
Later we’ll have to resolve a paradoxical situation with respect to typesetting the title and author, but for now we can don horseblinds.
Continue by creating prj-para.tex in the project directory:
\startenvironment *
  \setupalign[flushleft]
  \setupinterlinespace[small]
\stopenvironment
Again, the * means to substitute the file name; the name provides the linkage to prj-para within project.tex, so it is important that the file name and enironment reference match.
Next, change to the product directory and then create product.tex:
\startproduct *
  \project project

  \environment prd-para

  \component contents
\stopproduct
Also create prd-para.tex in the same directory:
\startenvironment *
  \setupalign[normal]
  \setupinterlinespace[medium]
\stopenvironment
The product refers to the contents component. For now, either copy or link to the contents from Jekyll and Hyde into the product directory:
cd $HOME/dev/writing/book
./build -V -b \
  robert-louis-stevenson_the-strange-case-of-dr-jekyll-and-mr-hyde
cd project/product
ln -s ../../contents.tex .
That trailing period (.) at the end of the ln command instructs ln to create a symbolic link in the current working directory. The file will have the same name as the linked file.
Compile the product (projects cannot generate PDF files):
cd $HOME/dev/writing/book/project
context product/product.tex --path=product
Passing --path tells ConTeXt where to find the resources referenced by product.tex, namely prd-para.tex and contents.tex.
The ConTeXt-generated product.pdf file resembles:
What this implies is that the product environment is overriding the settings from the project environment. To prove that the project-wide settings are applied by default, remove the setups from prd-para.tex by changing the file to the following:
\startenvironment *
\stopenvironment
Re-run:
context product/product.tex --path=productOpen the file to see that the project-wide styles are applied by default:
Both the paragraph justification and interline space have changed.
We have a directory and file structure for organizing both global styles and styles that are applied to specific documents.
Break the Build
Recall that pandoc staunchly refuses to create “broken” TeX output, which meant writing a lua filter named classify.lua to transcode the ::: annotations into TeX macros. The build script has an option to run that lua filter. Try the following:
./build -V -cConTeXt can no longer generate the PDF: the build is broken. This is the problem that the pandoc has tried to avoid, breaking the typesetting engine:
[20:38:12.3324] Convert ./main.tex to novel.pdf
ConTeXt failed with exit code 1.
return {
 ["filename"]="contents.tex",
 ["lastcontext"]="\nl.1 \\startbooktitle\n                  ",
 ["lastluaerror"]="?",
 ["lasttexerror"]="! Undefined control sequence",
 ["linenumber"]=1,
 ["offset"]=10,
}[20:38:12.9635] Postprocess
At first glance, the error message looks inscrutable. Take note of the values for Last TeX Error (lasttexerror) and Last Context (lastcontext): they inform the reader that \startbooktitle is not a recognized macro (control sequence). That tracks because the revised lua filter has the following line:
return pandoc.RawBlock( "context", macro .. "book" .. annotation )The "book" string was added to help avoid name collisions with existing macros, such as \starttitle and \stoptitle. Also, we don’t really know the entire list of possible annotations sprinkled throughout the epubs; someone could have used “text” as a classification, which would result in \starttext and \stoptext—and we definitely don’t want to redefine them! We just don’t know, at least not until the Markdown is generated.
Once a novel has been transcoded from XHTML into Markdown, the XSL templates export all known and unknown classes as annotations prefixed using :::. A short command chain lists the unique annotations:
grep "^::: " *md | sort | uniq | cut -d' ' -f2Jekyll and Hyde’s annotations include:
author
footer
letter
postscript
signature
title
valediction
The annotations must have corresponding start/stop definitions for ConTeXt to recognize them (e.g., \startbookauthor and \stopbookauthor). We’ll come back to these when defining postal letter themes in prj-letter.tex.
Fix the Build
Ensuring that the annotated texts don’t break the build entails the following high-level steps:
- rename files to convey the intent of usage;
- update references to use new file names;
- create contents in product directory; and
- define new start/stop macros.
Rename Files
Using project as a directory name doesn’t convey its purpose, nor does product spark much joy. Give them both new names that relate to their intention. For example, most of these books are coming from Standard Ebooks and the novel we’re typesetting is The Strange Case of Dr. Jekyll and Mr. Hyde, so the following names are more on-point:
standard-ebooks
├── standard-ebooks/jekyll-hyde
│   ├── standard-ebooks/jekyll-hyde/jekyll-hyde.tex
│   └── standard-ebooks/jekyll-hyde/prd-para.tex
├── standard-ebooks/prj-para.tex
└── standard-ebooks/standard-ebooks.tex
Update References
Once renamed, change standard-ebooks.tex and jekyll-hyde.tex to reference the appropriate project and product. That is, standard-ebooks.tex will use:
\product jekyll-hideAnd jekyll-hyde.tex must now reference the new project name:
\project standard-ebooksRebuild to make sure everything still works:
cd $HOME/dev/writing/book/standard-ebooks
context jekyll-hyde/jekyll-hyde.tex --path=jekyll-hyde
If all went well, a new PDF file is produced.
Create Contents
Previously, we copied (or linked) the contents.tex file into the product directory. The build script has options to automate this task:
-d(--directory) – Location of the main build file.-i(--input) – Name of the main build file (without extension).
By default, the main build file is searched for in the current working directory (.) and its file name is main—the .tex extension is added by the script. To use the standard-ebooks styling for Jekyll and Hyde, run the following:
./build -V -i jekyll-hyde -d standard-ebooks/jekyll-hyde -b \
  robert-louis-stevenson_the-strange-case-of-dr-jekyll-and-mr-hyde
Remember that the -c argument instructs pandoc to run the classifier lua filter, meaning the following will also break the build:
./build -V -c -i jekyll-hyde -d standard-ebooks/jekyll-hyde -b \
  robert-louis-stevenson_the-strange-case-of-dr-jekyll-and-mr-hyde
Although the build is still broken, we can organize the setups.
Define Macros
Temporarily change standard-ebooks/prj-para.tex to fix the build:
\startenvironment *
  \definestartstop[bookauthor][]
  \definestartstop[bookfooter][]
  \definestartstop[bookletter][]
  \definestartstop[bookpostscript][]
  \definestartstop[booksignature][][]
  \definestartstop[booktitle][style=italic, color=darkblue]
  \definestartstop[bookvalediction][]
\stopenvironment
Re-run:
./build -V -c -i jekyll-hyde -d standard-ebooks/jekyll-hyde -b \
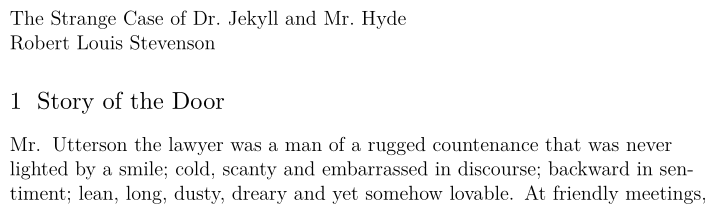
robert-louis-stevenson_the-strange-case-of-dr-jekyll-and-mr-hyde Review novel.pdf:

The build is fixed. At last, we can move on to crafting a project theme.
Project Theme
Defining all the styles in a single file would be boorish. Instead, consider isolating different presentation aspects by their responsibilities:
- body
- Complete novel contents
- colours
- Constants and setups for colours
- counters
- Values for tallying
- dimensions
- Constants for common sizes
- document
- Meta information about the document
- figures
- How figures are loaded and presented
- fonts
- Font families and font features
- front matter
- Adds title page and table of contents
- headers
- Page headers and footers
- headings
- Volume, part, chapter, section, and subsection headings
- layouts
- Margins and other page layout settings
- letters
- Hand-written postal letters
- lists
- Enumerated and itemized lists
- modules
- Modules to enhance functionality
- pages
- Page numbering
- paper
- Document page and trim sizes
- paragraphs
- Interline space, indentation, alignment, drop-caps, etc.
- penalties
- Restrictions regarding widows and orphans
- strings
- Constants for common words, nouns, and phrases
- tables
- Tabular data
- title
- Title page (author name and book title)
- toc
- Table of contents
- uppercase
- Font feature to employ uppercase text
More document components can be added as needs arise. The above list covers elements common to many books. We’ll explore a few key points of each in turn; download the theme source files in advance to follow along.
Body
Quite often books will use Roman numerals for the front matter and Arabic numerals for the prose. To make this happen in ConText, the front matter must be distinguished from the body matter. In the XSL file, the book’s body is annotated with ::: body, which is later translated to a \startbookbody macro. Inside prj-body.tex, that \startbookbody and its associated \stopbookbody macro are mapped to macros that ConTeXt can parse, namely \startbodymatter and \stopbodymatter:
\let\startbookbody\startbodymatter
\let\stopbookbody\stopbodymatter
Colours
Create a consistent colour experience by defining colour constants. For demonstration purposes, we’ll use a two-colour and one-shade system comprised of a main colour, an accent colour, and neutrals. A couple of sites to help pick out colours are Colour Lovers (most loved) and Colormind (lock-in colours and let the computer generate the rest). After settling on a palette, update the prj-colour.tex file.
\definecolor[BookColourMain][h=0081C2]
\def\BookColourDk{0.5}
\definespotcolor[BookColourMainDk][BookColourMain][p=\BookColourDk]

\setupcolors[
  state=start,
  rgb=yes,
  textcolor=BookColourNeutralDk,
  pagecolormodel=auto,
]
The first line defines a new colour named BookColourMain with the hexadecimal colour code that represents its colour. ConTeXt has many ways to assign colour values, including definitions that are relative to other colours by using \definespotcolor where the p option can be used to lighten or darken the new colour.
Providing state=start ensures that colours show up in the document; setting textcolor=BookColourNeutralDk adjusts the book body text colour; and using pagecolormodel=auto (versus none) can sometimes help with transparency issues in PDF files.
My convention uses Dk or Lt as suffixes to denote darker or lighter colour variants defined for the theme.
Counters
This file has no setups because poems have been covered extensively. Refer to the poem counter described in the previous sections for details.
Dimensions
Constants in the prj-dimensions.tex file can control various measures that relate to the output document. General fiction, for example, has a common paper trim size of 5½ x 8½ inches—see my interior book design notes for additional standard sizes. Such measurements can be defined in a single location for later use via the \measure{} macro:
\definemeasure[BookPageTrimWidth][5.5in]
\definemeasure[BookPageTrimHeight][8.5in]
Document
Setting up the document gives us the opportunity to enable hyperlinks, configure colours for internal and external links, and assign both the title and author metadata. Accomplish these tasks as follows:
\enabledirectives[interaction.identity.preroll]
\enabledirectives[interaction.bookmarks.preroll]

\setupinteraction[
  state=start,
  color=BookColourNeutralDk,
  contrastcolor=BookColourAccent,
  title={\BookTitle},
  author={\BookAuthor},
]
Enabling those directives ensures that TeX symbols (such as ~, a non-breaking space) are replaced with their appropriate counterparts within the PDF file’s properties and bookmarks.
Using \BookTitle and \BookAuthor for the interaction options is one reason why a circular dependency is created, which we’ll resolve later.
Figures
Many books, especially technical ones, will have a variety of image types. Inside prj-figures.tex we can set the file extension order for image precedence. Here we see that a vector graphics file is preferred over any other file type that has the same name (but different extension):
\setupexternalfigures[
  order={svg,pdf,png,tif,jpg},
  location={default},
]
This means, for example, that if illustration.svg exists then it will be embedded in the document, despite illustration.jpg existing as well.
Fonts
Before beginning with fonts, download some to use in your book(s), like the following free fonts that pair well together:
- Vollkorn (serif)
- Vollkorn (small caps)
- Montserrat (sans serif)
- Rochester (cursive)
Download and install them as follows:
Click one of the above font links.
Click Select this style on any available style (e.g., Thin 100).
Click Download family.
Save to a known directory, such as
$HOME/archives.Repeat for the remaining font links.
Install the files into a directory, such as
$HOME/.fonts/ttf.mkdir -p $HOME/.fonts/ttf cd $HOME/.fonts/ttf unzip -o $HOME/archives/Montserrat.zip unzip -o $HOME/archives/Vollkorn_SC.zip unzip -o $HOME/archives/Vollkorn.zip unzip -o $HOME/archives/Rochester.zipSet the
OSFONTDIRenvironment variable, such as (be mindful of the double slash–//–at the end, it informs the typesetting engine to also scan subdirectories for fonts):export OSFONTDIR="$OSFONTDIR;$HOME/.fonts//"Reload the fonts so that ConTeXt will find them:
mtxrun --script fonts --reloadMake sure the fonts can be found by listing them:
mtxrun --script fonts --list --all | grep -i vollkorn
The fonts are installed. To learn more about how ConTeXt loads and uses fonts, readers are encouraged to browse the following documents:
Open prj-fonts.tex to review the key lines:
\definefontfamily[BookFontFace] [rm] [Vollkorn] [bf=name:vollkornscregular]
\definefontfamily[BookFontFace] [ss] [Montserrat]
\definefontfamily[BookFontFace] [hw] [Rochester]

\setupbodyfont[BookFontFace]
The first three lines map core font styles—serif (rm), sans serif (ss), and handwritten—to specific fonts. Official font names from the font files, such as Vollkorn, can be found by using the following command:
fc-scan $(fc-list | cut -d':' -f1 | grep -i vollk) | grep "family:"where vollk could be monts or roch. Notice that bf typically means boldface but the value has been deliberately set to the small caps font, Vollkorn SC Regular. Although mtxrun does not show the official font name, we can list and use font identifiers as follows:
mtxrun --script fonts --list --all | grep -i vollk | cut -d' ' -f1where vollk is in the font name. The output has vollkornscregular in the returned list of font identifiers. Most font names identifiers (or names) include sc to indicate small caps. Assigning the small caps font to the bold font face adheres to the Standard Ebooks specification.
Defining fonts this way is far simpler than described previously.
Front Matter
Front matter consists of a table of contents placed in prj-frontmatter.tex, to be styled in prj-toc.tex:
\definestructureconversionset [frontpart:pagenumber] [] [romannumerals]

\startfrontmatter
  \setuppagenumbering[location=bottom]

  \completecontent
\stopfrontmatter
The page numbering, only for the front matter, is set to the bottom. This demonstrates a way to differentiate front matter page numbers from prose page numbers, beyond the usual Roman versus Arabic. We also set the page numbers to Roman numerals for the front matter to stay classy.
Typically, colophon and copyright pages would also be included here.
Headers
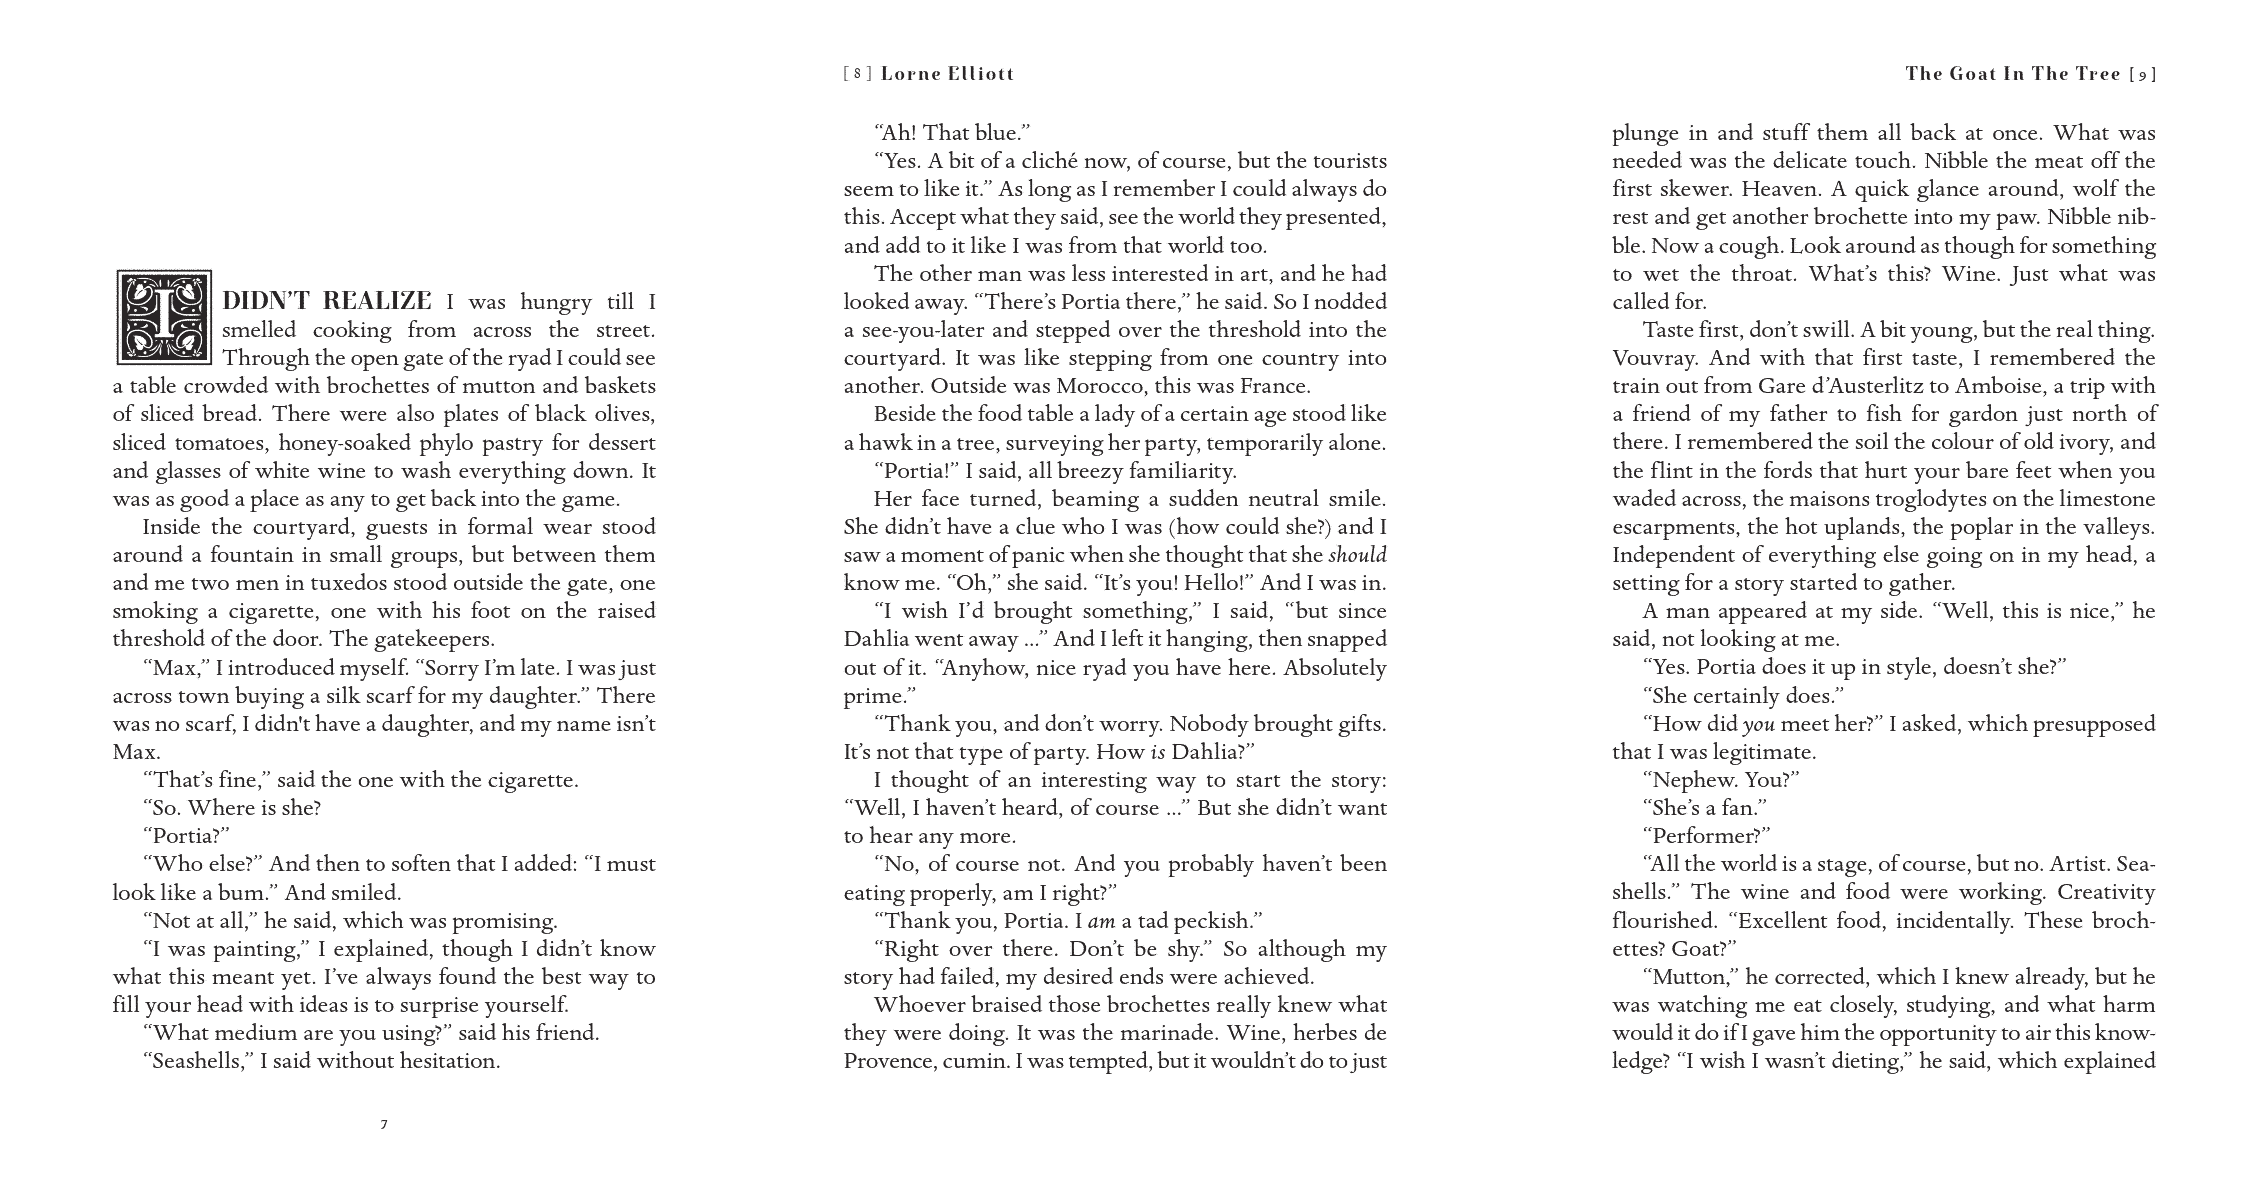
Review the interior book design page to see common combinations for running headers. From the sample designs given previously, The Goat in the Tree had a nice touch: page numbers in square brackets, a little lighter than the rest of the text. That looks as follows:
\def\BookPageNumber{[~\userpagenumber~]}

\setupheader[color=BookColourNeutralLt]

\setupheadertexts
  [\BookTitle]
  [\BookPageNumber]
  [\BookPageNumber]
  [{\getmarking[section]}]

\setuppagenumbering[location=]
The tildes give some space between the square brackets and the page number. Note the special \userpagenumber macro, which will be defined later. Calling on \setupheader provides the opportunity to set various features of the headers as a whole at a single location in the code; in this case, changing the colour to something lighter than the prose.
Use \setupheadertexts to change the text supplied in the running header. You can think of the call as follows:
\setupheadertexts
  [Left Page, Left Side]
  [Left Page, Right Side]
  [Right Page, Left Side]
  [Right Page, Right Side]
These settings won’t be visible until double-sided mode is enabled.
Lastly, we need to clear out the default page numbering (location=) because we’ve customized how we want the numbers to look in the book.
Headings
For me, one of the more rewarding parts of interior book design with ConTeXt is styling the section headings—possibly because the setuphead command has so many features! By default novel chapters start on a right-hand page and the prose starts about a third of the way down the page. Take a look at prj-headings.tex:
\setuphead[section][
  page=BookSectionPageBreak,
  style=\tfa\ss,
  color=BookColourNeutral,
  header=empty,
  footer=BookFooterPageNumber,
  alternative=middle,
  numbercommand=\groupedcommand{}{\blank[\measure{BookSectionTitleDepth}]},
  after={\blank[\measure{BookSectionProseDepth}]},
  sectionconversionset=BookSectionNumerals,
]
Here’s how most of these options work:
- Setting
page=BookSectionPageBreakforces a new right-hand page at the beginning of each section; further, if the left-hand page was inserted to meet the right-hand rule, then the running header is hidden. - Setting
header=emptysuppresses a page header on the new section pages. - Setting
footer=BookFooterPageNumberapplies the page numbering for footers as defined inprj-headers.tex. Effectively, new section pages are numbered at the bottom. - Setting
alternative=middlecenters the title. - Setting
numbercommand=...adjusts the vertical whitespace in between the section number and title. - Setting
after=inserts vertical whitespace after the section title, forcing the prose to start about a third from the top. - Setting
sectionconversionset=ensures that Roman numerals are used to number section titles. The table of contents is configured independently.
Keep in mind that BookSectionNumerals is not yet defined. Any product that requires custom numerals must define them explicitly. Steps to do so are captured in the table of contents section.
Layouts
Layouts provide a lot of control over typesetting pages: margins, running header/footer height, amount of space for typesetting text, and more. The following figure names the major typesetting areas of a page in ConTeXt:

Defining layouts can prove useful when debugging page regions to determine how ConTeXt is laying out the page. Even without custom layouts, ConTeXt has a \showframe macro that will draw an outline for all the typeset frames on a page. We’ll limit our usage of layout setups to enforcing grid alignment, as follows:
\setuplayout[grid=yes]When typesetting in a column environment, a grid layout can help ensure that the text across all the columns is aligned.
Letters
Earlier the following setups were added to fix the broken build:
\definestartstop[bookfooter][]
\definestartstop[bookletter][]
\definestartstop[bookpostscript][]
\definestartstop[booksignature][][]
\definestartstop[bookvalediction][]
These move into prj-letters.tex so that we can simulate a hand-written letter by applying the following styles:
- make the text narrower from the enclosing prose;
- allow flush left (“ragged right”) paragraphs;
- forgo hyphenation;
- set the font style to hand-written; and
- insert vertical whitespace before and after.
In code, this resembles:
\definestartstop[bookletter][
  style=\hw,
  before={%
    \setupnarrower[
      left=\measure{BookLetterIndent},
      right=\measure{BookLetterIndent}
    ]
    \startnarrower[left, right]
      \setupalign[
        hz,
        hanging,
        nothyphenated,
        flushleft,
      ]
      \blank[big]
  },
  after={%
      \blank[big]
    \stopnarrower
  }%
]
Most of these options can be reasoned without much explanation. Sometimes using nothyphenated is insufficient to remove hyphens from the right-hand side altogether; so, hz tells the typesetting engine that slight horizontal stretching of characters is acceptable, and hanging permits punctuation to protrude (hang) a bit beyond the text’s width.
What’s important about these lines is that the \setupalign takes place inside the \startnarrower block so that it applies only to the letter. Moving \setupalign outside the narrower environment will affect all the text after the letter as well. (Yes, it is possible to add another \setupalign in the after= option, but that leads to maintaining the code in two places.)
Due to the way I prefer to format code, the % is necessary after the after, otherwise ConTeXt cannot parse the \definestartstop.
Lists
Here we find a simple setup for bullet lists, which won’t be belaboured:
\setupitemgroup[itemize][1][packed, autointro][The individual items are packed together, meaning no vertical whitespace between them; using autointro attempts to prevent any widowed items.
Modules
ConTeXt has numerous modules that make configuring certain aspects of a book much easier. When installing or updating ConTeXt, all the modules can be installed by provided the --modules=all command line argument:
sh ./first-setup.sh --modules=allDepending on where ConTeXt is installed, the module documentation will be installed within a subdirectory containing third-party files:
$CONTEXT_HOME/tex/texmf-modules/doc/context/third/...For example, the fancy break module is documented under:
.../fancybreak/fancybreak-doc.pdfPages
Distinguishing the body matter from the front matter provides fine-grained control over the page numbers written into the document as well as the page numbers displayed in the PDF reader itself. In the following figure, the page number in the top-left shows i while the page number typeset into the document’s header also shows i:
Different conceptual page numbers are applied to the document. First, the front matter is using the default page counter; we changed its appearance using the \definestructureconversionset macro. Second, is a “user page” concept, which is a counter initialized only for the body matter. Arguably, the counter could be defined in the prj-counter.tex file.
\startsectionblockenvironment [bodypart]
  \setcounter [userpage] [1]
\stopsectionblockenvironment
The value is retrieved using \userpagenumber, which we saw earlier in prj-headers.tex.
Paper
Use prj-paper.tex to control the size of the final PDF file’s dimensions, which can strongly influence the resulting printed paper size. There are many ways to control the paper size, add crop marks, and more. Here is a simple way to set the page size to the predefined trim size:
\definepapersize[BookTrimSize][
  width={\measure{BookPageTrimWidth}},
  height={\measure{BookPageTrimHeight}},
]

\setuppapersize[BookTrimSize]
Paragraphs
By default, ConTeXt will not indent the first paragraph immediately after a new section. To change this, tell the typesetter how much to indent subsequent paragraphs:
\setupindenting[
  yes,
  \measure{BookParagraphIndent}
]
Not being an option list, refrain from adding a trailing comma after the last configuration item.
Penalties
My preference is to make the widows and orphans extremely expensive and therefore extraordinarily rare, which the following lines accomplish:
\setpenalties\widowpenalties{1}{10000}
\setpenalties\clubpenalties {1}{10000}
Strings
If there are any common strings, they would be defined as macros in this file. Some examples include:
- Company name that publishes the books
- Book ISBN identifier
- Publication date
- Typesetting software name
- (ahem) Special thanks to yours truly for these blog posts
Anything, really, that relates to all the books being typeset.
Tables
ConTeXt has many table mechanisms, including Extreme Tables, which are generated by pandoc. Reimagine the default setups as follows:
\setupxtable[
  frame=off,
  topframe=on,
  bottomframe=on,
  framecolor=BookColourMainLt,
  toffset=2pt,
  boffset=2pt,
  option={stretch, width},
  split=yes,
]

\setupxtable[foot][
  rulethickness=1pt,
]
Table cells in Extreme Tables can be treated similar to frames, thus:
frame=off– turn off top, buttom, left, and right borderstopframe=on– turn the top border back ontoffset– add padding to the cell’s topoption={stretch, width}– extend the columns to their maximum extentssplit=yes– allow the table to span multiple pages
The second half of a split table follows:
Title
Back to that paradox: the novel’s contents are embedded into the product; the product uses styling from the project; the project attempts to typeset a title page; and the title page needs the title, which is in the product’s contents. This circular dependency is depicted in the following figure:
Another way to think about this is that by the time the typesetting engine sees \BookTitle, the macro must have already been defined.
There are many ways resolve the paradox, but most of them involve obscure TeX magicros, lua filters, or more XSL code. An easy solution is to extract the author name and book title from contents.tex so that they can be imported before the title page references them—a task for the build script. (See the -y option to “yank” the author and title from the novel’s contents.)
Note that the ordering of prj-title.tex is important. Setups must precede the aspect of the document they are to style.
A makeup is a separate page, such as a title page, colophon, or copyright page. By default, standard makeups in ConTeXt have the following convenient properties:
- vertically centered;
- no header, no footer; and
- no page number.
To center the title page text horizontally, in addition to the default vertical centering, we codify the following:
\setupmakeup[standard][
  align=middle,
]

\startstandardmakeup
  \BookTitle

  \BookAuthor
\stopstandardmakeup
Toc
Jekyll and Hyde’s table of contents is pretty svelt out the gate, but let’s use Roman numerals for the chapter numbers. First, edit jekyll-hyde.tex (in the standard-ebooks/jekyll-hyde directory) to include a product-specific table of contents. When finished, the file will resemble:
\environment prd-toc
\environment prd-paragraphs

\project standard-ebooks

\component c_jekyll-hyde
Including the local environments before the project environments is imperative. Changing the order means that project-level definitions are declared first. Once declared, most of them cannot be changed.
Next, create prd-toc.tex in the same directory:
\startenvironment *
  \definestructureconversionset[BookSectionNumerals][,,R][n]
\stopenvironment
Deferring creation of the BookSectionNumerals to a product environment allows product-specific changes to the numerals used for sections (i.e., chapters) in the table of contents.
Standard Ebooks
When finished, the style environments inside of standard-ebooks.tex will be imported in dependency order.
Resolving the circular dependency meant extracting the title and author into a separate file, named prd-strings.tex. That file, logically, belongs with the other product-specific files. If the file isn’t present, we don’t want the book build process to fail. At the top of standard-ebooks.tex are definitions for the only macros absolutely required by the build:
\def\BookTitle{}
\def\BookAuthor{}
Any value can be placed inside the braces, such as a warning to the editor that neither book title nor author name could be found. Once we have a guarantee that the macros exist, we can try to override the values by loading the product-specific values:
\doifdocumentargument{book}{%
  \environment \getdocumentargument{book}/prd-strings
}
Basically, the snippet imports the prd-strings.tex file from the product that’s being built. The name of the product being built is passed in on the command line when building a document, which can be seen in the call to ConTeXt inside the build script:
context --nonstopmode --batchmode --purgeall \
  --book="${OPT_CONTEXT_BOOK_NAME}" \
Here, the book in --book is what gets passed as a parameter into the documentargument macros shown above. The OPT_CONTEXT_BOOK_NAME variable value is set using the -i command line argument to the script. When ConTeXt runs through standard-ebooks.tex, the snippet that is interpreted for Jekyll and Hyde effectively becomes:
\environment jekyll-hyde/prd-stringsWe need to make sure that prd-strings exists, which—as mentioned—the build script creates after pandoc produces contents.tex. That pesky circular dependency is resolved.
Modes
Novels generated using the technique described above are created with physical printing in mind. We all want to save trees, so a mode to generate a version for on-screen viewing is desirable. One way to control the output format is through modes.
ConTeXt controls page margins for left/right pages through the not-so-obviously named \setuppagenumbering macro. In prj-pages.tex we see:
\setuppagenumbering[alternative=doublesided]Add a mode for screen by using a \startmode block after that line, like so:
\setuppagenumbering[alternative=doublesided]

\startmode[screen]
  \setuppagenumbering[alternative=singlesided]
\stopmode
ConTeXt will use double-sided pages unless screen mode is enabled, whereby the page type is changed to single-sided. Our illustrious build script does not currently pass in the mode to ConTeXt, so you’ll have to add that yourself. Here’s a hint:
context --nonstopmode --batchmode --purgeall \
  --book="${OPT_CONTEXT_BOOK_NAME}" \
  --path="${PATH_PROJECT},${ARG_PATH_CONTEXT_TEX}" \
  --result="${ARG_FILE_CONTEXT_PDF}" \
  --modes="${ARG_CONTEXT_MODES}" \
  "${ARG_FILE_CONTEXT_MAIN}" > /dev/null 2>&1
If you get stuck, let me know.
Download
Download the themes, distributed under the MIT license.
Summary
This part covered many topics:
- using lua filters to parse annotated Markdown;
- defining counters for the keys in key-value pair maps;
- general overview of interior design;
- transcoding novels from XHTML format into Markdown;
- concepts for structuring projects and products; and
- applying project- and product-level themes to novels.
The last part in this series will explore drawing with MetaPost.
Contact
About the Author
My career has spanned tele- and radio communications, enterprise-level e-commerce solutions, finance, transportation, modernization projects in both health and education, and much more.
Delighted to discuss opportunities to work with revolutionary companies combatting climate change.